Fundamentally, railway sleepers have one very important use – railway tracks. They lay horizontally underneath the metal tracks to hold them in place at the right gauge.
While other materials have been tried and tested, wooden sleepers have always come out on top as the perfect material to use for railways. Millions of these sleepers are used every year to build new lines and keep existing ones up to date, but that is not all that they’re good for.
In fact, sleepers are hugely popular in the gardening world due to their vast array of uses and benefits. From their beautiful looks to their extremely high durability and lifespan, sleepers have the potential and the versatility to play a huge role in your garden design.
Hardwood or softwood, which one would you choose? This question is commonly asked in the gardening world – and for a good reason, too! There are obvious similarities between hard and soft wood but there are also differences that need to be addressed, this is what we will be focussing on in this section of the guide.
Firstly, the actual physical ‘hardness’ and softness’ of the wood has no correlation to its name. In other words, hardwood is not necessarily hard just like softwood is not particular soft. Instead, the name derives from the type of seed from which the particular tree has grown. If a tree’s seed has some form of covering over it, for instance a fleshy coating or nutty shell, then it is described as a hardwood. If the seed does not have any sort of coat or cover, and is therefore bare, it is known as a softwood. Evergreen trees – trees that keep their leaves all year round – are another strong indicator of a softwood.
Unfortunately, without any treatment or staining, a lot of these woods (mainly softwood) will struggle to last a reasonable amount of time outside before turning a dull grey colour. When new, though, their colours differ profusely. For instance, a brand new hardwood would usually be either a golden or red-brown colour. On the other hand, a treated softwood begins as a yellowish-brown but gets darker and more honey-like after one or two weeks outside.
Hardwood could be seen as the ‘go-to’ wood for garden decoration like furniture and decking but should this always be the case? Possibly. But hardwood is not better nor worse than softwood so either of them will be perfect for the right cause. Hardwood is merely different to softwood, that is all.
On the whole, it is slightly more difficult to deal with hardwood. This is because it usually requires a little bit more woodworking skill to be produced effectively. Where you may be able to risk using nails with softwood, it is very important that nails are not used for hardwood. Even screwing into hardwood without any pre-drilled pilot holes would be a bad idea. This is because, due to the strength and density of the wood, it’s liable to crack or split.
Choosing the wood is the easy part, after that it needs to be maintained. Without proper maintenance it will not last half as long as it’s supposed to. Regardless of whether it is hard or softwood, it needs to be treated properly to become a worthwhile investment. With correct treatment, for example, softwoods can last for more than 20 years!
If you are still undecided on which type of wood you’d prefer your sleeper to be, then the only other major difference between these two types of wood is the impact they have on the environment. This is a key factor to take into consideration if you, like many others, are concerned about the condition of our environment.
In general, trees that grow very slowly produce hardwood. This is because by taking a longer time to grow, more natural oils can be absorbed and produced making the wood denser and so forth. Softwood, on the other hand, is produced from trees that grow a lot quicker – coniferous trees, for example – hence why they are not usually as dense as hardwood.
Most of the trees that produce hardwood grow in the tropics, a long distance away from us. A knock on effect of this is cost of production and shipping is it is more expensive. For every tree that is cut down a new one is planted in its place, however, but nonetheless, it is still an important environmental factor to take into consideration.
Coniferous trees, the main tree that grows softwood, grows within the northern hemisphere rather than the tropics, this allows shipping and production to drastically drop in price compared to the tropical trees. Another positive aspect of softwood is that, in many cases, multiple trees are planted in replace of every singular tree that is cut down. This is a brilliant way to keep the environment happy. As they grow a lot faster, too, they are definitely the more economical choice of wood.
Due to the denseness of hardwood and the amount of natural oils it contains, it takes a lot longer for the drying process to be completed. This requires more energy and because of the nature of the wood, it is commonly used for higher grade timber, insinuating it is dried to a lower moisture content than many softwoods. All of this energy consumption does not have a positive impact on the environment.
Softwoods grow a lot faster than hardwoods and are grown much closer to where they are sold. The energy used in the processes of drying and cutting is also less for softwoods as it’s quicker so the effects on the environment are further reduced.
Not sure on what type of sleeper you need for your garden project? Give us a call! Grabco stock a range of soft and hardwoods cut to different sizes – and once your garden is complete, use our Essex grab hire service to remove all your garden waste!

Railway sleepers have been around for longer than you can imagine. Ever since the 1550’s where ‘Wagonways’ (the initial origin of railways) were constructed by the Germans. These Wagonways were created to make an easier and faster route for wagons to travel instead of using the dirt roads. They were pulled over rails by horses.
The wooded rails and wagon wheels where then replaced with iron in the mid 1700’s and the lines were renamed Tram Ways. Horses were still the source of energy pulling the carts but at this point the iron rails had spread all throughout Europe. Then, in the late 1700’s an English man designed the first flanged wheeled wagon. The flange, also known as a groove, allowed the wheels to grip the rails better, furthering the stability of the wagons.
By the very early 1800’s the steam powered train made its first ever journey across a railway – still being supported by the wooden sleeper.
Since the production of wooden tracks to avoid dirt roads, all the way up until present day, the wooden sleeper has not lost its purpose. It is still used today in many types of railway construction, such as: tram tracks, underground tracks, harbour tracks, narrow gauge tracks, and even tracks for the new Japanese Bullet Train!
Sleepers are still, to this day, a very important part of railway construction and are seen as an absolute essential material.
In previous years, all you needed to create a sleeper was a piece of wood and an axe. Axe-men would hew a variety of hard and soft woods in sawmills or in forests which resulted in the beloved sleeper. However, the number of skilled axe-men able to perform this art is rapidly decreasing so, in turn, production at forests and sawmills are also decreasing.
At present, with modern technology and the use of preservative treatment for the timber, machinery and factories are now the source of almost all of the country’s sleeper production. The fundamental process looks a bit like this:
As we now know, there are many types of sleeper. Whether it’s a softwood such as pine, a hardwood like oak or anything in between, there are many to choose from. Because of this, inspection and classification needs to occur. This usually involves grading them into sizes and seasoning.
Seasoning timber is easier than you think, all you need is air and time! The highest quality woods are dried naturally with air as it is the most effective and environmentally friendly way to do it. Yes, it is a time consuming process but the outcome is definitely worth the wait.
The timber should be consistently tested for its moisture content. On average, it should not be processed further until the moisture content drops to 30% or less.
Before any treatment or pressure impregnation, the timber is ready to be fabricated – as long as the moisture content has reached the desired percentage.
The treatment your timber requires is dependent on what it will be used for. Creosote used to be the most popular chemical due to its extremely high life expectancy. Although it is still used on sleepers used for railways, it cannot be used for garden sleepers anymore due the health problems that can be potentially caused from it. Copper biocide is now the preferred chemical to use as it can still provide a life expectancy of up to 30 years for the timber.
Copper biocide impregnation will be effective for around half the time of creosote. However, although the duration of this treatment is a lot less than creosote, it is far less harmless. This treatment is best for timbers that will be used as furniture or many outdoor garden features like edging or privacy walls.
Other preservative treatments to use for softwoods are:
These will all penetrate the wood in a similar way and cause protection for a varied amount of time.
Hardwoods are not treated with any pressure impregnation as they naturally have a long enough lifespan to effectively fulfil all their possible garden purposes.
Wood is the universal material used for the sleeper. Yes, you can find iron, concrete and steel sleepers too, but they are no match for the overall value of the wooden sleeper. The properties they possess come together to form the ideal material for their purpose.
However, like with anything, sleepers do have some disadvantages to go up against their many positives. Below is a list of both advantages and disadvantages of the universally used wooden sleeper.
Whether it’s being the strong, durable railway sleeper on the track or the aesthetic, artistic garden sleeper, the options seem to be limitless for this highly useful material.
Where can we use sleepers in the garden? You’d never expect such a simple object to be so versatile when it comes to design. But, funnily enough, this rectangular wooden block can transform and improve your garden in a number of ways, here are just a few:
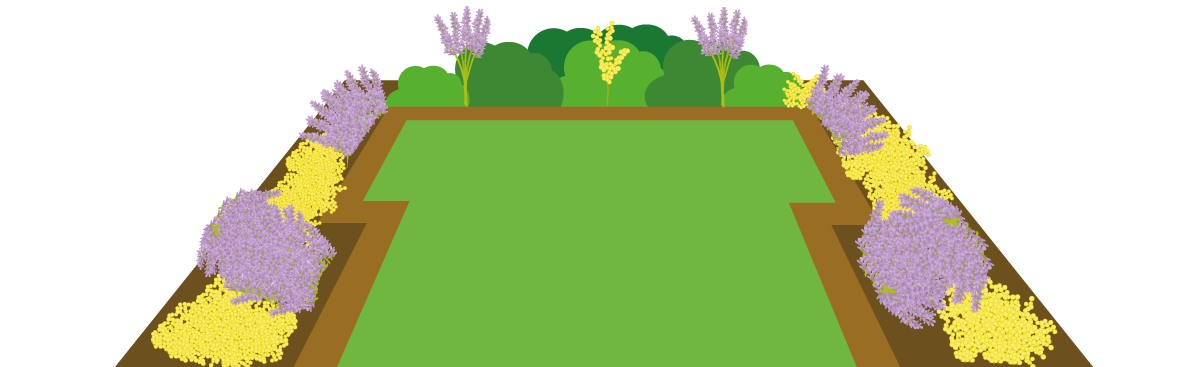
Sleepers are perfect for garden edging as they can be used either on their edge or flat, in a single height. With a combination of versatility, ruggedness and the traditional rustic look, sleepers are the perfect ingredient to form a naturally beautiful border around your garden – with minimal effort, too.
Try it for yourself! It’s easier than you think and with this guide on how to do it (below) you can design the perfect edging for your garden.
To successfully edge your garden, you need a plan. This means you need to know where you will put your sleepers, how high they will go and how many you need. After working this out, you will need to outline the areas in which your sleepers will be placed. You can do this with various spray paints or anything similar.
Once you know where you want your sleepers to go, you need to prepare the ground for them to securely sit there for a very, very long time. After digging up the designated areas, there are three main options you can choose from when preparing the ground for your sleepers: a concrete foundation, a sand or gravel filled base layer, or just the natural soil.
Your choice solely depends on how much of a perfectionist you are. For a perfectly flush result, lay your edging on a foundation of concrete and use a spirit level to ensure the perfect finish. If you’re too impatient for the whole concrete process, then the other two options will work just as well.
Now the ground is prepared, you can begin to border your garden. Depending on which option you chose in step 2, you will either need to let the sleepers set into the concrete or secure them into the ground with stakes.
If you’re not using concrete, you will need to attach two long stakes into either end of each sleeper to secure them into the ground. This can be done with a few screws and a drill.
Use a spirit level make sure your edging is as flat as possible.
Each component of the base layer needs to be connected together to ensure the edging has no chance of moving. There are two main ways to do this: either diagonally screwing the ends of two separate sleepers together (and so on), or use metal strips on the bottom or inside of the edging to bind them together.
If you want your edging to be taller than one sleeper. then you need to add another layer on top of the base. Fortunately, this is a lot simpler than laying the first layer but you still need to take just as much care.
Assembling the second layer, and any other layer, is very similar to the base, the only difference is that this layer will be sitting on sleepers which makes things a lot less difficult. All you really have to do is connect each component of the new layer the same way you did with the previous one and fasten each corner of the top layer to the one beneath it with a long screw.
Finally, you have the option to coat your edging. If you bought your sleepers brand new, they may need to be coated in a protective layer to increase it’s lifespan; if you bought them second hand, they probably already have a layer of coating on them so you can choose to recoat them or leave them.

Creating a path is a brilliant way to break up your lawn, give people easy access across the garden and prevent your grass from getting ruined. There are many types of paths you can choose from such as gravel, bricks or paving slabs, but have you ever thought of using sleepers for your garden path?
Not only are sleepers extremely hardwearing, versatile and stylish, you can also walk on them with bare feet! Sleepers will not heat up from the sun like stone or concrete paths which allows you to easily walk on them with no foot protection – this is an opportunity that most other path materials cannot provide and can further the natural feel of your garden.
In many cases, your garden will slope down or upwards in some places. If you want to build a garden path but feel like your garden is too steep for it, why not consider incorporating steps into your path? Sleepers are just as good steps as they are a path!

To add a unique twist to your garden, creating a raised garden pond with sleepers might be just what you need. You can either use brand new timber for a more modern, flush finish for the garden or a used set to enhance the rustic, natural look to your garden.
When building a pond in your garden, you first have to discover where the best place to put it will be. Will people be able to get around it? Or sit by it? How many sides are accessible? Once all of these questions are confidently answered and you’re happy with the results, you can begin building.
Now you know where you want your pond, you need to obtain the correct amount of sleepers and cut them into the correct lengths for your desired shape and size. For the best results, rectangular ponds are recommended.
Lay your sleepers on the ground in your square or rectangular shape with them touching at the corners. Similar to the previous guide, the ground needs to as flat and as firm as possible. Due to the fact that you don’t need to consider drainage (as you are building a pond!) it doesn’t matter what material you lay the sleepers on, as long as it’s flat.
Using timberlok sleeper screws (the recommended screws to use for sleepers) fasten the corners of the sleepers together. Make sure enough of the screw goes into the adjoining sleeper to ensure a strong connection, it’s advisable to allow 2 inches.
By repeating step 3 you can add as many layers as you want to your pond, it all depends on how deep you want it. The method used to attach each separate layer together is dependent on how your sleepers have been laid. If they are laying on their wider edge, you can screw straight through the top until you reach the layer underneath.
If the sleepers are laying on their narrower edge, your screws may not be long enough to be effective. If this is the case, you have two alternative options: you can diagonally screw through the side of the top layer into the layer below or use wire or a metal strip to attach them all. The choice is yours.
Before adding pond liner, you need to make sure it will not get damaged. So, clear away any rough or sharp objects within your pond structure. Once you have done this, find a carpet-like material and put this on the floor of the pond, this is so there is no chance of the pond liner ripping.
Now, attach the pond liner to the inside of your newly created sleeper structure. Then, fold the excess lining over the top layer. A good idea is to add a final layer on top of the folded over lining to hold it in place and hide it.
For the final step, turn your newly developed sleeper structure into a pond by adding the all important water… and fish!

It doesn’t stop there: if edging, paths and ponds are not enough sleeper for your garden, why not use them as furniture?
Due to their durability, long-lasting lifespan and rustic look, they have the perfect features for many standard pieces of garden furniture. A garden bench, for example, could easily be made out of the garden sleeper, along with tables, seats, pillars and even walls!
Do you have a sloping garden? This could be a problem for your soil, decorative stone or any other items that do not work too well with gravity. Sleepers are your saviour! A sloping site means your soil or stones are prone to slipping and falling out of their designated place, by constructing either vertical or horizontal walls with sleepers your problem is solved. Due to their high durability, sleepers can support your rebellious soil (etc.) with ease and without looking out of place.
I bet you didn’t think something as boring as a railway sleeper could revitalise your garden in such useful ways, did you?
But there is no denying it, the wooden sleeper is not only versatile, durable and long-lasting, it’s also cheap and can be the perfect improvement to your garden’s aesthetic appeal!
Regardless of whether you need a dividing garden wall, you want your lawn to have a beautifully bordered edging, or you want to build a garden pond, sleepers can help you achieve almost every gardening need.
It doesn’t stop there! Sleepers have a huge variety of uses and I’m sure, if you think hard enough, you could use a railway sleeper in your garden.
So, if you’re planning to create a new path, build a new garden bench or make a new flower bed, consider using our garden sleepers to turn your ideas into a reality.